
dsh-ios
Display an iOS Simulator or USB-connected iPhone beside a DeepSeek Harness conversation, with device control, Xcode builds, UI inspection, logs and SwiftUI previews.
Project overview
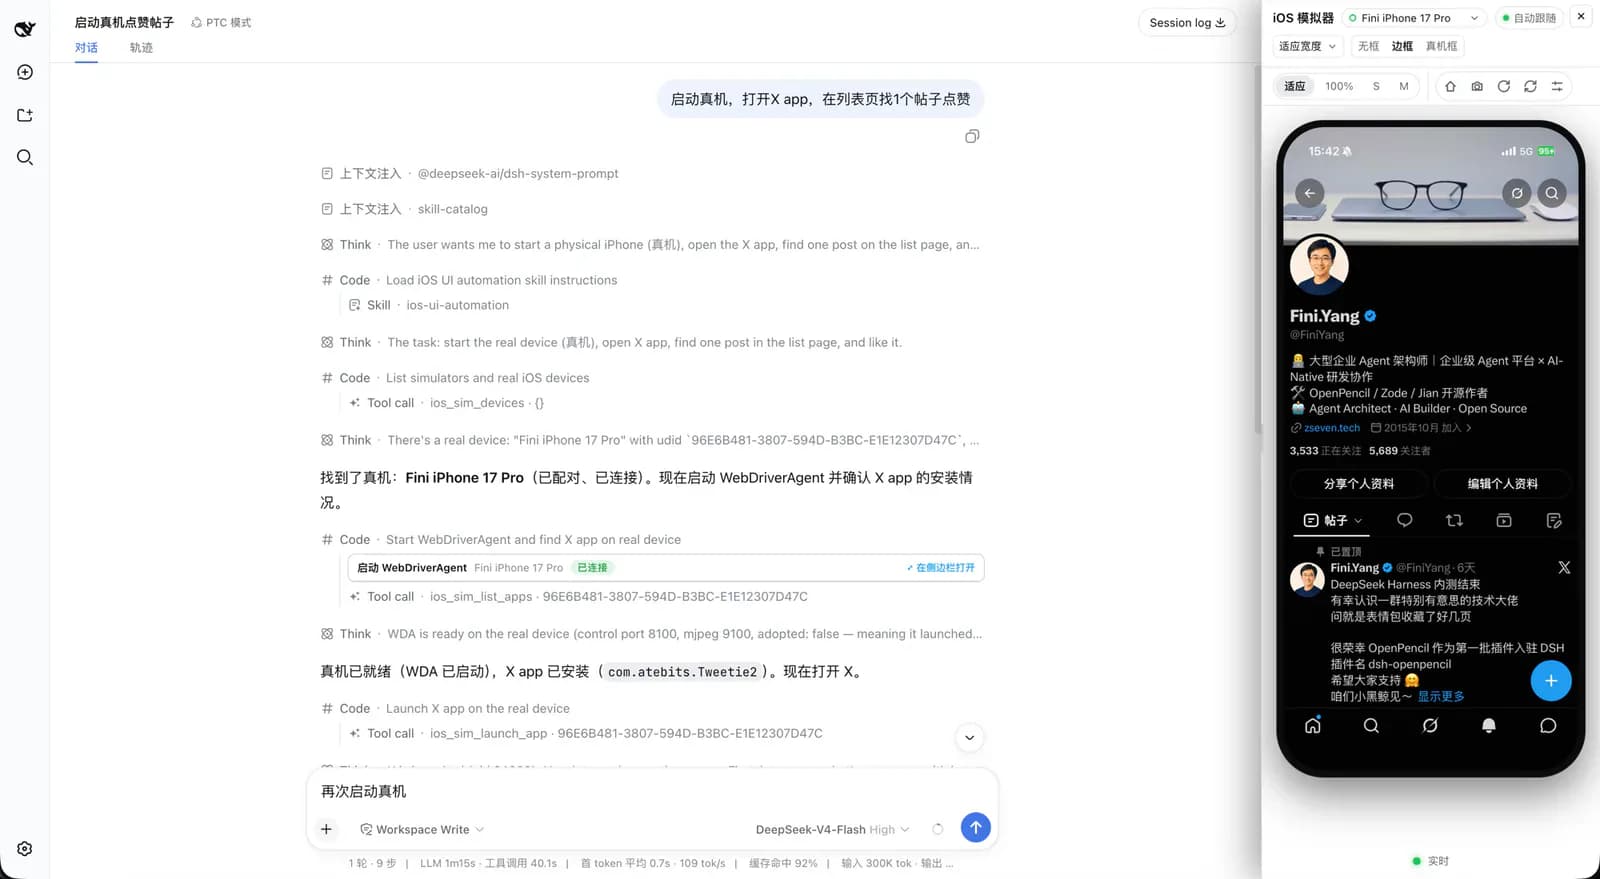
dsh-ios brings a live device view into a DeepSeek Harness conversation. An agent can discover devices, build an Xcode project, inspect UI elements and perform actions while you watch or interact with the sidebar. Simulators use simctl and serve-sim; USB iPhones use WebDriverAgent. It is neither an iOS emulator for Windows nor a standalone remote-control service: the actual work depends on a Mac with Xcode.
Core capabilities
Live display and interaction
The persistent sidebar supports taps, drags, rotation, screenshots and zoom. Tool-result cards can reopen the panel.
Identity-based UI actions
Accessibility tools locate labels and identifiers; Vision OCR can find text when the tree is unhelpful. Row tools identify list items and can verify counter changes.
Build and debug
Build, install and launch Xcode projects or Swift packages, then inspect unified logs, processes and app metadata. Backtrace and leak inspection are simulator-only.
SwiftUI previews
A temporary host outside the package loads preview code as a dynamic library and watches source changes for hot replacement.
Installation and usage
Verify a simulator first, then add a physical phone if needed. The npm package includes serve-sim, but does not prepare Xcode or WebDriverAgent signing.
Let an AI Agent install it
Send this prompt to Codex, Claude Code, or another AI agent that can work with your local environment.
Install dsh-ios from https://github.com/ZSeven-W/dsh-ios . Read README, package.json and LICENSE. Check macOS, full Xcode, a simulator runtime, Node.js ≥24.11.0 and DSH Web. Run `dsh plugin --profile web add @zseven-w/dsh-ios@latest`, then start or restart `dsh web`. Use an actual identifier returned by ios_sim_devices to boot a simulator and verify the live display and UI tree. Only if I request a physical phone, check USB, developer mode, WDA sources and signing. Ask before credentials, additional permissions, tool downloads, overwriting files or real-account actions. Do not automatically enable administrator privileges, like posts, send messages or make purchases. Report commands, changes and observed verification results.- macOS with full Xcode and at least one iOS Simulator runtime
- Node.js ≥24.11.0 and a working DSH Web installation
- README baseline DSH ≥0.1.0-rc.6; author-tested version 0.1.1-rc.1
dsh plugin --profile web add @zseven-w/dsh-ios@latest
dsh web- 1Check the Mac toolchain
Confirm full Xcode, an installed simulator runtime, Node.js ≥24.11.0 and a working `dsh web`. Command Line Tools alone are insufficient.
- 2Install and start Web
Run the documented commands: ```sh dsh plugin --profile web add @zseven-w/dsh-ios@latest dsh web ``` Restart an existing Web process at an appropriate time.
- 3Boot a discovered simulator
Ask the agent to list simulators with ios_sim_devices. Choose a returned name or UDID, call ios_sim_boot and check the live sidebar.
- 4Read the UI before adding a phone
Open simulator Settings and call ios_sim_ui_tree, installing AXe if prompted. For the optional physical-phone path, prepare WDA sources, signing and developer mode, unlock the USB iPhone and pass its realDevices UDID to ios_real_start_wda.
Call ios_sim_devices and pass a returned simulator name or UDID to ios_sim_boot. Confirm that the sidebar updates continuously, then open Settings and read ios_sim_ui_tree. Actual UI nodes confirm that the inspection path works.
- UI-tree tools require AXe: `brew install cameroncooke/axe/axe` is documented, as is a pinned first-use download.
- For a physical phone, prepare a WebDriverAgent checkout at `~/Library/Caches/dsh-ios/wda/src`, then call ios_real_start_wda.
- Do not use real-account likes, messages or payments as a smoke test.
Use cases
Inspect your app's interactions
Build an app, observe it in the sidebar and use element identities to inspect buttons, lists and state changes.
Iterate on SwiftUI components
Start previews for a supported Swift package and inspect hot-reloaded source changes.
Assessment
This assessment is based on the README, manifest, license and commit history. Combining build, observation, actions and logs is useful for developers who already have Xcode. Signing and toolchain setup remain significant prerequisites; one npm command is not a complete physical-iPhone setup. We did not install or test it.
Why it may be useful
- Live pixels and structured tools provide complementary feedback
- Similar interaction interfaces for simulators and USB iPhones
What to know first
- Non-macOS hosts can register the tools but cannot perform iOS device operations
- WebDriverAgent sources must be prepared separately; the plugin does not clone them
- Free-team signing lasts 7 days; physical devices do not support simulator-only backtrace or leaks
README
dsh-ios
Overview
Display an iOS Simulator or USB-connected iPhone beside a DeepSeek Harness conversation, with device control, Xcode builds, UI inspection, logs and SwiftUI previews. Display an iOS Simulator or USB-connected iPhone beside a DeepSeek Harness conversation, with device control, Xcode builds, UI inspection, logs and SwiftUI previews.
Getting started
- Verify a simulator first, then add a physical phone if needed. The npm package includes serve-sim, but does not prepare Xcode or WebDriverAgent signing.
- Device frames travel through signed same-origin DSH routes rather than direct browser access to serve-sim or WDA ports.
- The 22 documented tools cover devices, builds, UI trees, OCR, logs, previews and debugging; simulator and physical-device coverage differs.
- Call ios_sim_devices and pass a returned simulator name or UDID to ios_sim_boot. Confirm that the sidebar updates continuously, then open Settings and read ios_sim_ui_tree. Actual UI nodes confirm that the inspection path works.
Configuration
dsh plugin --profile web add @zseven-w/dsh-ios@latest
dsh web